


Permalink#90Days of DevOps challenge
#day5 task of the #90daysdevops challenge.
- Write a bash script createDirectoriess1.sh that when the script is executed with three given arguments (one is the directory name and second is the start number of directories and the third is the end number of directories ) it creates a specified number of directories with a dynamic directory name.
- Here we use the shell scripting commands to create 90 directories of Sum at a time.

Create a nano file with .sh
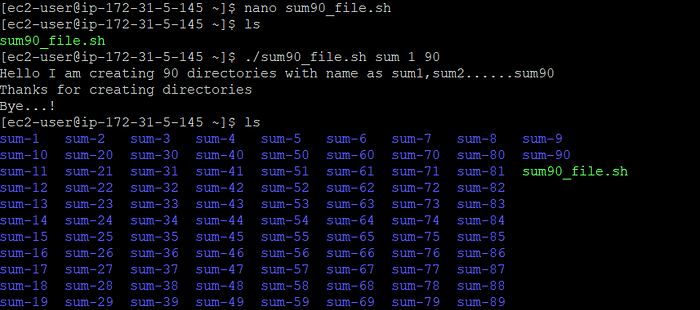
Created Sum directory from 1 -90.
2. Create a Script to backup all your work done till now.

Create a nano file with .sh

Outputs


3. Read About Cron and Crontab, to automate the backup Script
Cron is the system’s main scheduler for running jobs or tasks unattended. Cron is a time-based scheduling daemon that runs on Unix and Linux systems. It is used to schedule commands or scripts to run automatically at a certain time or date.
Crontabe : To edit, submit or delete in cron a command is used called as crontab which allows user to do. A crontab file is a user file that holds the scheduling information. You can use crontab to run any of your scripts or one-liners every hour, or maybe just three days a week, it’s up to you. Each user can have their own crontab file if they wish, but on large systems root usually disallows this and just uses one main crontab file for the whole system. Root is able to do this because of a file called ‘cron.deny’ and ‘cron.allow’ where root can specify who can and cannot have their own crontab.
Open the crontab configuration file by running a command crontab -e
Add a new line to the file with the schedule and command you want to run.
Save and exit the file Cron will automatically run the command or script at the specified time according to the configuration in the crontab file.
To check list of current crontab configuration use command crontab -l.
4. Read about User Management and Let me know on Linkedin if you’re ready for Day 6.
A user is an entity, in a Linux operating system, that can manipulate files and perform several other operations. Each user is assigned an ID that is unique for each user in the operating system. In this post, we will learn about users and commands which are used to get information about the users. After installation of the operating system, the ID 0 is assigned to the root user and the IDs 1 to 999 (both inclusive) are assigned to the system users hence the ids for local user begins from 1000 onwards.
In a single directory, we can create 60,000 users. Now we will discuss the important commands to manage users in Linux.
i. To list out all the users in Linux*, use the* awk command with the -F option. Here, we are accessing a file and printing only the first column with the help of print $1 and awk.
awk -F':' '{ print $1}' /etc/passwd
ii. Using the id command, you can get the ID of any username. Every user has an id assigned to it and the user is identified with the help of this id. By default, this id is also the group id of the user.
id username
iii. The command to add a user. useradd command adds a new user to the directory. The user is given the ID automatically depending on which category it falls in. The username of the user will be as provided by us in the command.
sudo useradd username
iv. Using passwd command to assign a password to a user. After using this command we have to enter the new password for the user and then the password gets updated to the new password.
passwd username
v.The command to change the user ID for a user*.*
usermod -u new_id username
vi. Command to Modify the group ID of a user*.*
usermod -g new_group_id username
This command can change the group ID of a user and hence it can even be used to move a user to an already existing group. It will change the group ID of the user whose username is given and sets the group ID as the given new_group_id.
5. Create 2 users and just display their Usernames.

Added 2 users

List of 2 users